


Stock chart patterns are visual price formations like flags, flat tops, and bases that show you where buyers and sellers are fighting. They are useful. They are also the most oversold concept in trading education. I have traded them since 1999, full time since the end of 2007, and through 7,000+ students at Bulls on Wall Street I have watched the same mistake repeat for almost two decades: traders treat a pattern as a signal when it is actually just context.
This guide gives you the exact patterns I trade, split into my two buckets. Big picture patterns on the daily chart for swing trading. Intraday patterns for day trading, organized by time of day, because the pattern that pays you at 9:45 AM will empty your account at 12:30 PM. Every trade example in this post is real, with tickers and levels from my own trading, including three trades I took the morning I wrote this.
The One Sentence That Separates Winners From Losers
A chart pattern is evidence, never a verdict.
The edge does not come from the shape. It comes from combining the pattern structure with volume, trend, level location, and confirmation. The textbook says when a head and shoulders breaks the neckline you must short. Most of the time that fails. In a strong bull market the pattern usually just tags support and rips back in your face. The same exact pattern inside a distribution phase, sitting at a major level, with volume confirming? Now you have a trade.
This is true for my own patterns too. I am a momentum trader. If I run my momentum patterns in a range bound market that is calling for mean reversion, my patterns fail, even though I think I have the best patterns in the game. Flip it around and a mean reversion trader grinding fades through a raging bull market gets run over doing everything his system says. The pattern did not change. The context did.
The academics agree, which almost never happens with trading content. MIT researchers Lo, Mamaysky, and Wang published a study in the Journal of Finance that found some chart patterns do carry real information, but that patterns which look statistically significant are not automatically profitable to trade, and classics like the head and shoulders may not even be the optimal shapes. Translation from academic to trader: the shape alone is not the edge. Read the paper if you want the math.
My Swing Trading Patterns
These are the big picture patterns I use for multi-day and multi-week holds. Three of them live on the daily chart and one lives on the weekly, but all four use the 9 EMA as the risk anchor. That is the unifying thread. If you take one thing from this section, take that. Every chart below comes from TC2000, which I have used for scanning and charting for years.
1. The Flat Top Breakout
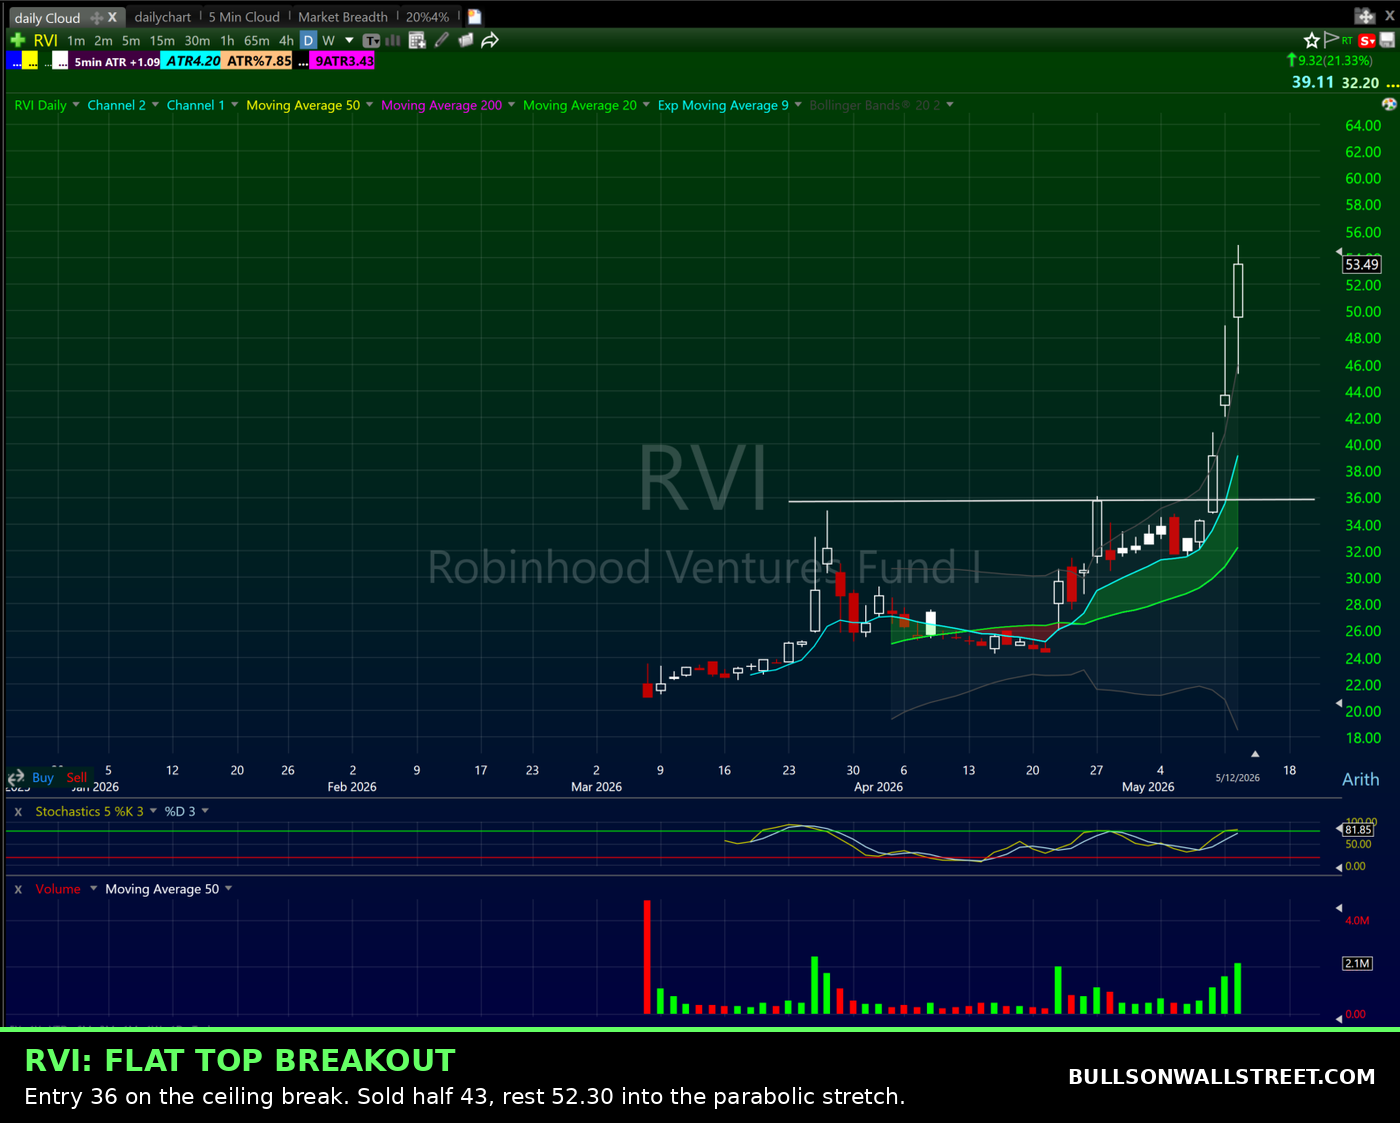
A stock goes on a trend, then consolidates for multiple months and builds a flat top at the highs. Price keeps tapping the same ceiling while the lows rise underneath it. When it finally breaks that range, I want to see the 9 EMA curling up underneath the breakout level so I can use it for stop placement. The tighter the coil under the ceiling, the better the trade.
Real example: RVI. The stock ran off its lows, then spent weeks pressing against the same ceiling around 36 while the 9 EMA curled up underneath it. I entered at 36 on the break. Sold half at 43, and the rest at 52.30. And I will be honest about the exit, because this is where real trading differs from the textbook. My Free Trade rule says trail the stop up the EMAs. But RVI went parabolic and stretched so far above the moving averages that waiting for the trail to catch up would have given back a huge chunk of the move. When a stock goes vertical like that, I scale out into the strength instead. I still left a lot on the table. That is the trade-off you accept when a winner runs harder than your plan imagined, and it is a good problem to have.
TTMI ran the same play even cleaner. The stock pressed against the same ceiling for close to three months while the lows rose and the 9 EMA coiled underneath. I entered at 109.50 on the break, sold my first piece at 130.55, and my next at 148.25. Two different stocks, same pattern, same 9 EMA risk anchor. That repeatability is the entire point of trading patterns instead of predictions.

2. The Flag Breakout
This one has rules, not vibes. I need a minimum 10 percent thrust move first. Then a 3 to 10 day consolidation. The key word is tight. Sloppy, wide flags are not flags, they are chop. The 9 EMA needs to be curling up right under the consolidation. When price breaks the flag, the stop goes under the 9 EMA and you are risking a small, defined amount against a stock that has already proven it can move.
Real example: MU. Micron thrust hard, flagged tight above its rising 9 EMA, and broke. I entered at 536.44 with a stop at 499. Scaled out in quarters because the market cycle was a steep run-up: first piece at 629.30, next at 707.50, and the last at 803 as the stock went parabolic and stretched away from the EMAs. Stocks like SNDK ran the identical play all through the same trend: thrust, tight flag, break, repeat. When the market is in that phase, the flag breakout prints money on name after name.
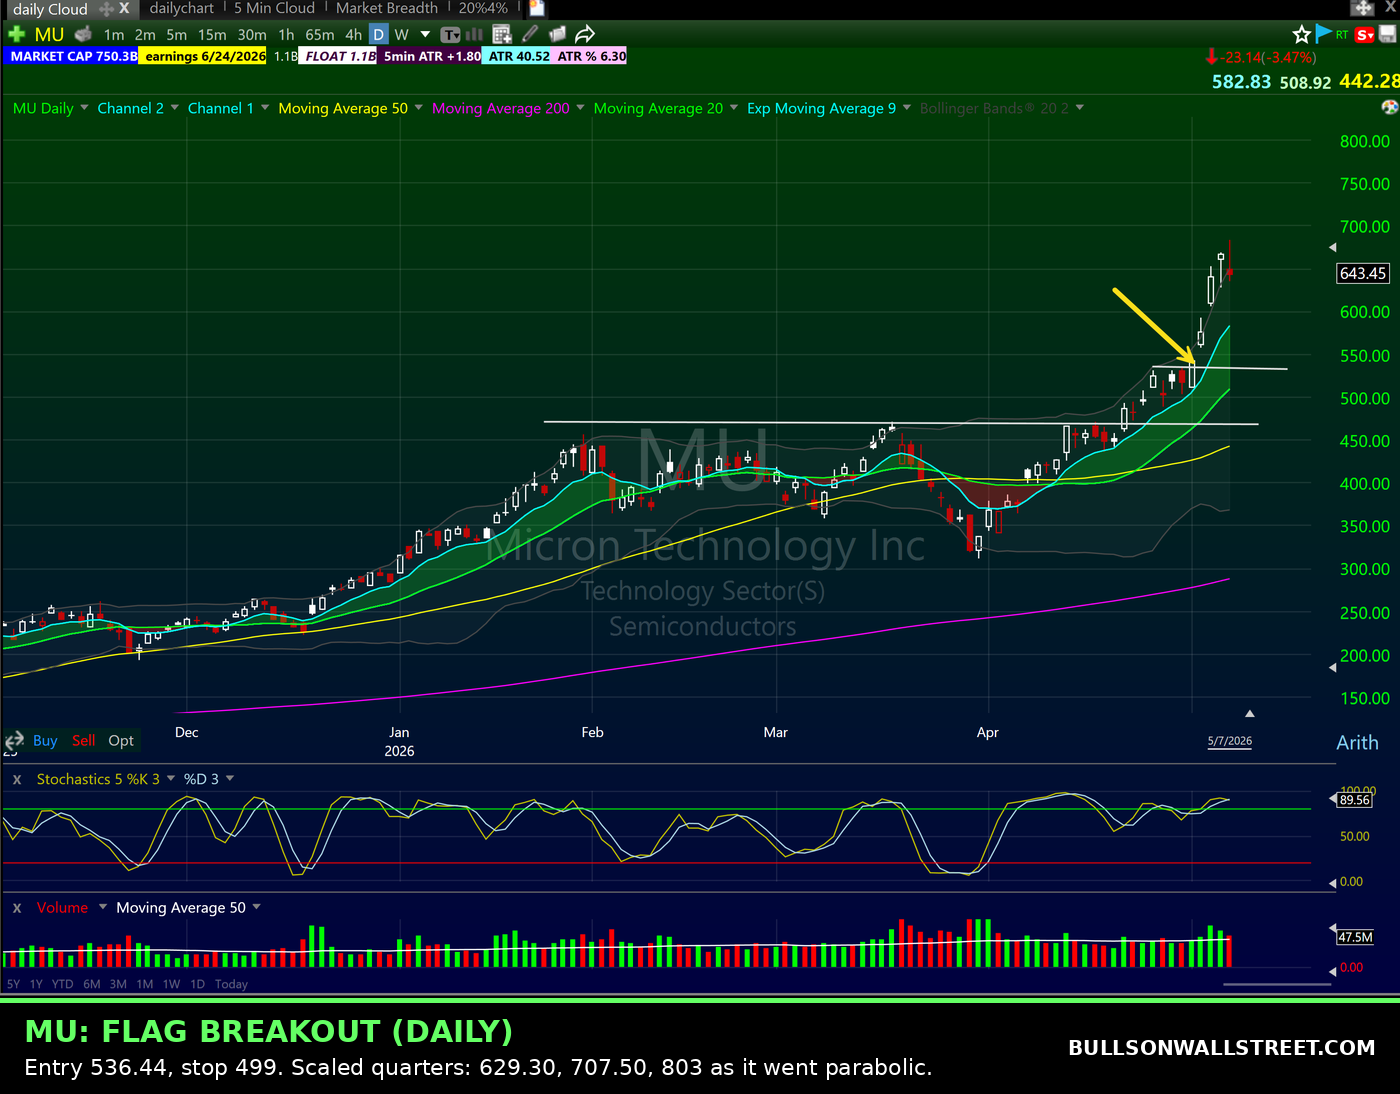
Remember MU, because it shows up again later in this post. I caught the daily flag as a swing trade, and weeks later day traded the first pullback on the same stock. One ticker, both buckets, one framework.
3. The Base Breakout
This is the pattern that starts most major trends, and almost nobody trades it because it requires patience. A stock drops 50 percent or more off its highs, then consolidates near the lows for multiple months building a base. Over time that ugly bear chart becomes neutral. Sellers exhaust. The stock starts testing the top of its range. It almost always takes a catalyst to thrust it out of that bottom range, usually a PR or an earnings report, because something has to change the story. You are essentially buying a stock coming out of its accumulation phase before the crowd notices it exists again.
One important difference from my other swing patterns: I trade base breakouts off the weekly chart, not the daily. It is a longer pattern, so I want a looser stop and a higher potential reward, and the weekly 9 EMA gives me both.
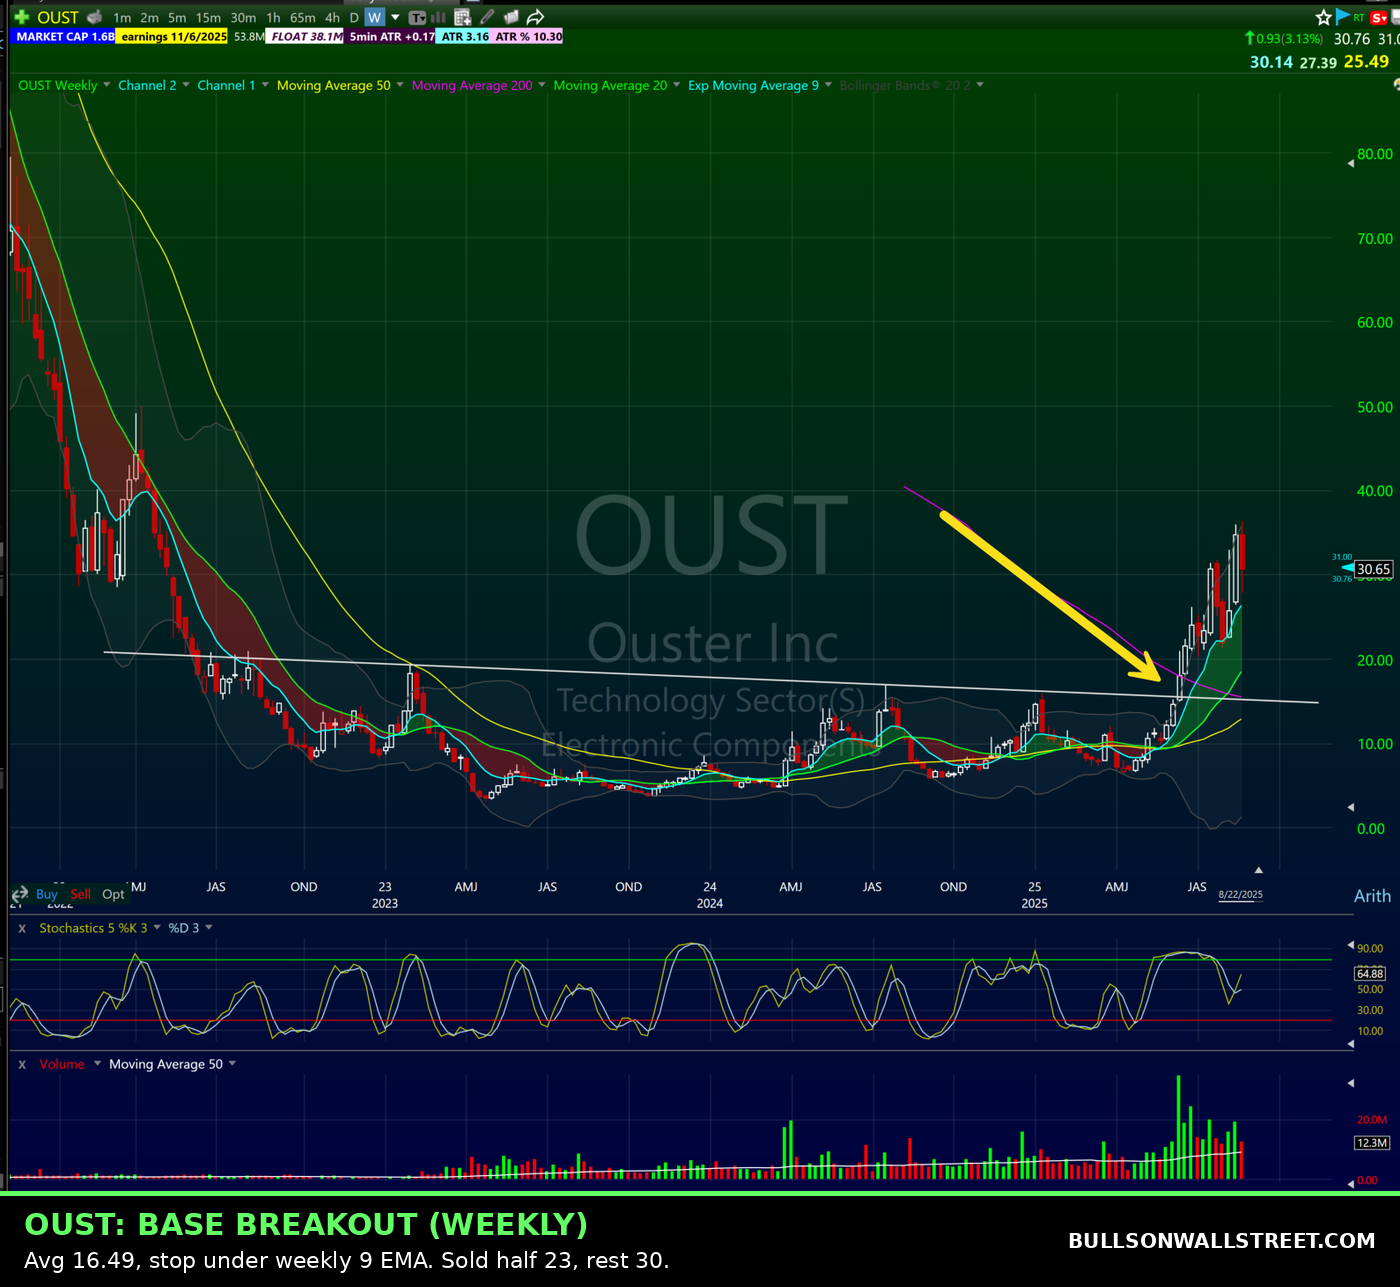
Real example: OUST. Ouster fell from the 80s all the way into the single digits and spent years grinding sideways near its lows, building a massive base under a multi-year downtrend line. When it finally thrust through that resistance, I bought with a 16.49 average and put my stop under the weekly 9 EMA. I sold half at 23 and the rest at 30. That is the base breakout in one trade: a left-for-dead chart, a multi-month base, a break of the ceiling, and a defined stop under the 9 EMA on the timeframe that matches the pattern.
4. The Daily Bone Zone Pullback
Once a stock breaks out from any of the three patterns above and starts trending, I do not chase it. I wait for pullbacks into the Bone Zone, my name for the shaded area between the 9 EMA and 20 EMA. On the daily chart, a pullback into that zone on decreasing volume followed by a green candle is my entry to join a trend already in motion.
Real example: MTSI in the spring of 2026. The stock was in a strong daily uptrend and pulled back quietly into the zone between the 9 and 20 EMA. I went long at 270.44 with a stop at 260. Then I scaled out in quarters instead of my usual halves: first piece at 303.50, next at 350, third at 383.90, still holding the last quarter as a lotto. Why quarters? Context again. The market was in a steep run-up phase, and in that environment the play is to sell slower and let winners stretch, because the trend is doing the heavy lifting. In a choppier tape I would have sold halves and been done sooner. Even my exit plan answers to the market cycle. Buying pullbacks like this gets you into an established trend with tight, defined risk instead of chasing the highs. I built my whole swing pullback approach around it, and you can go deeper in my swing trading pullback strategy guide.

My Day Trading Patterns, Organized by Time of Day
Here is where most pattern education completely falls apart. Traders learn a pattern, then run it all day long. Huge mistake. The market is a different animal at 9:45 than it is at 12:30, and running morning patterns at midday, or midday patterns in the morning, is one of the most common reasons day traders bleed out without understanding why.
I break the trading day into three buckets. The open. The midday. The close. Each bucket gets its own patterns.
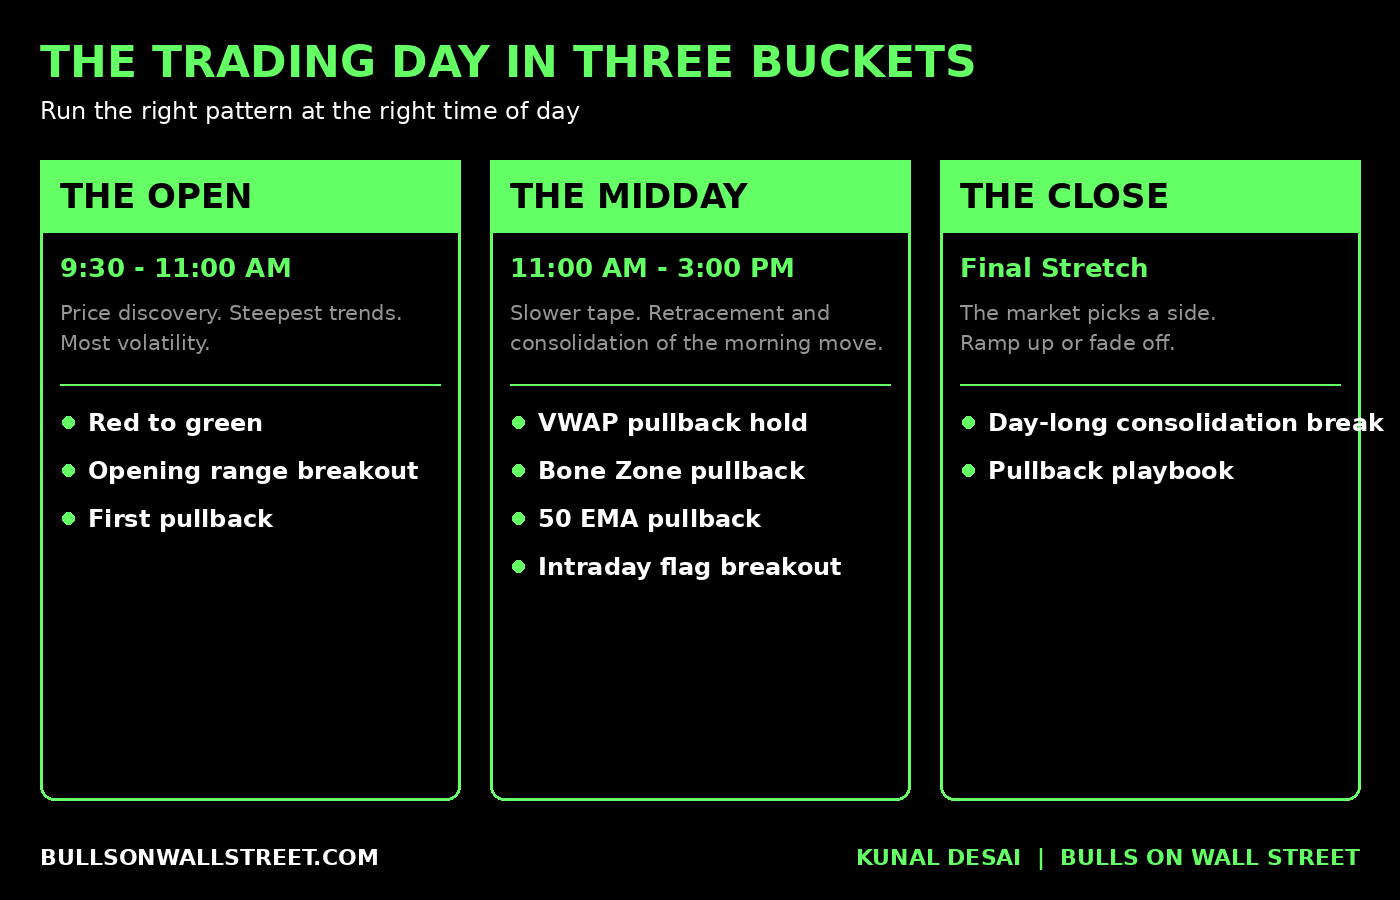
The Open: 9:30 to 11:00 AM
This is where you get the most volatility and the steepest trends. It is pure price discovery. Stocks are absorbing overnight news and finding their ranges, and this window is where I typically make most of my money. Three patterns live here:
Red to green moves. When a stock opens weak, goes red on the day, then reclaims its open, that flip from red to green traps every seller who hit the open and forces them to cover into strength.
The opening range breakout. Stock gaps up, goes sideways while the opening range forms, then breaks it. I break down my full 3-candle version in my opening range breakout guide.
The first pullback. A gapping stock rips off the open, then gives you its first orderly pullback. This is my bread and butter, and I will show you a real one from this morning below.
The Midday: Slower Tape, Deeper Pullbacks
After 11 the market slows down and the morning move typically goes into retracement or consolidation. Different environment, different patterns. Morning momentum plays stop working, so we shift to deeper pullback plays.
The big one at lunchtime: hot morning names pulling all the way back into VWAP. When one of those leaders retraces into VWAP and prints a green candle that holds the level, you can take the position with an extremely tight risk against the line. If you do not know VWAP cold, start with my what is VWAP guide, because it is the most important intraday level in the market.
The Bone Zone still works midday on the 5-minute chart, and we add deeper pullback plays into the 50 EMA. Midday is also where intraday flag breakouts set up, since the consolidation itself is what midday tape does naturally.
The Close: The Market Picks a Side
Into the last stretch of the day the market usually chooses. It either ramps up or fades off. The pattern I hunt here is the day-long consolidation break, which is really just one big long flag pattern that has been building all session. A stock that held its morning gains and flagged sideways for hours will often resolve with a push into the close, and the whole pullback playbook stays in effect.
If you want the complete system these patterns plug into, my day trading strategies pillar covers the full framework, and every one of these setups runs through the rules on my risk management page. Patterns get you in. Risk management keeps you alive.
Three Real Trades From One Morning: July 21, 2026
Theory is cheap. Here is how this played out in my actual trading the morning I wrote this post.
MU: First Pullback Into the Bone Zone
Micron gapped up around 12 percent on the open. Classic morning setup: big gap in a liquid leader. I did not chase the open. I waited for the first pullback into the Bone Zone on the 5-minute chart. MU pulled back to around 920, I built my average at 925, and my stop went at the low of the candles sitting inside the Bone Zone. On a stock trading in the 900s, my risk was tiny relative to the range.
Then the trade manages itself. As MU trended, I trailed my stop up along the Bone Zone, scaled out pieces as it hit my reward to risk targets, and converted the remainder into a Free Trade. If the Free Trade concept is new to you, read my full breakdown of what a Free Trade is, because it is the single most important trade management idea I teach.
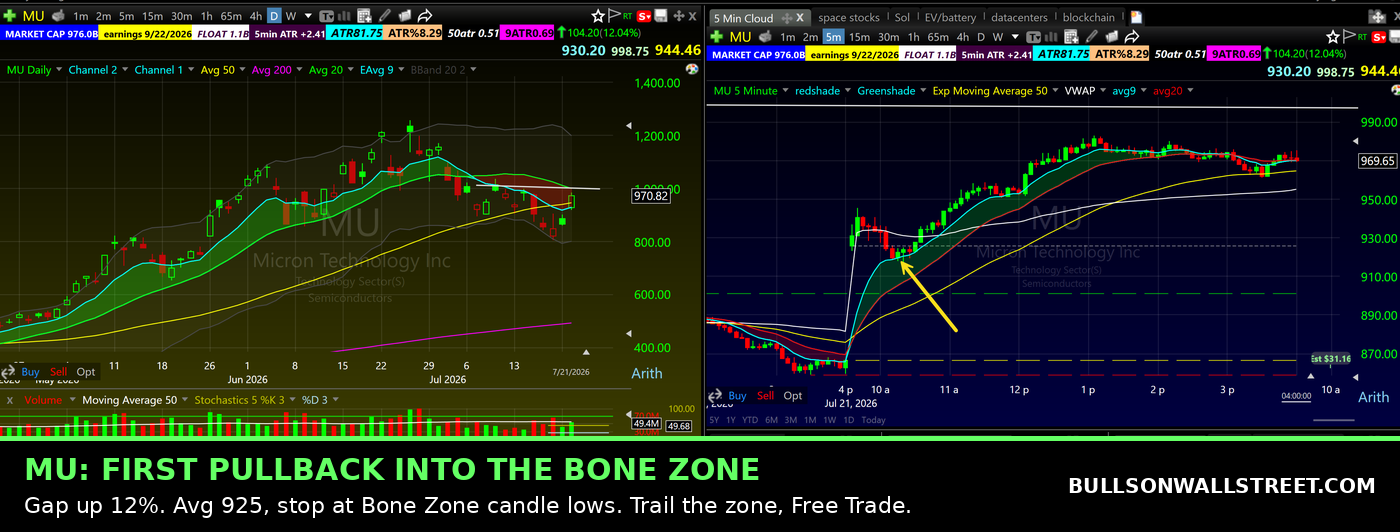
One more thing this chart shows, and it is the whole thesis of this post in one image: at the same time MU was giving the intraday Bone Zone entry, the daily chart showed MU pulling back into the daily Bone Zone within its bigger uptrend. This is the same MU I swing traded off the daily flag breakout at 536.44 earlier in this post. The swing pattern told me the trend was real, and the intraday pattern gave me a second way to attack the same strength. Swing pattern and intraday pattern aligned on the same ticker. That is what context looks like. That is why the trade was an A+ and not a coin flip.
ASTS: Opening Range Breakout
AST SpaceMobile gapped up small in the morning and went sideways for three candles while the opening range formed. On the fourth candle it broke the range. I entered at 60.47 with my stop under VWAP. Into the first spike, once I had a minimum 3 to 1 reward to risk, I sold off half. Then the Bone Zone took over as my trailing stop and the rest of the position became a Free Trade. ASTS ran past 64 during the session while my risk on the remaining shares was zero.
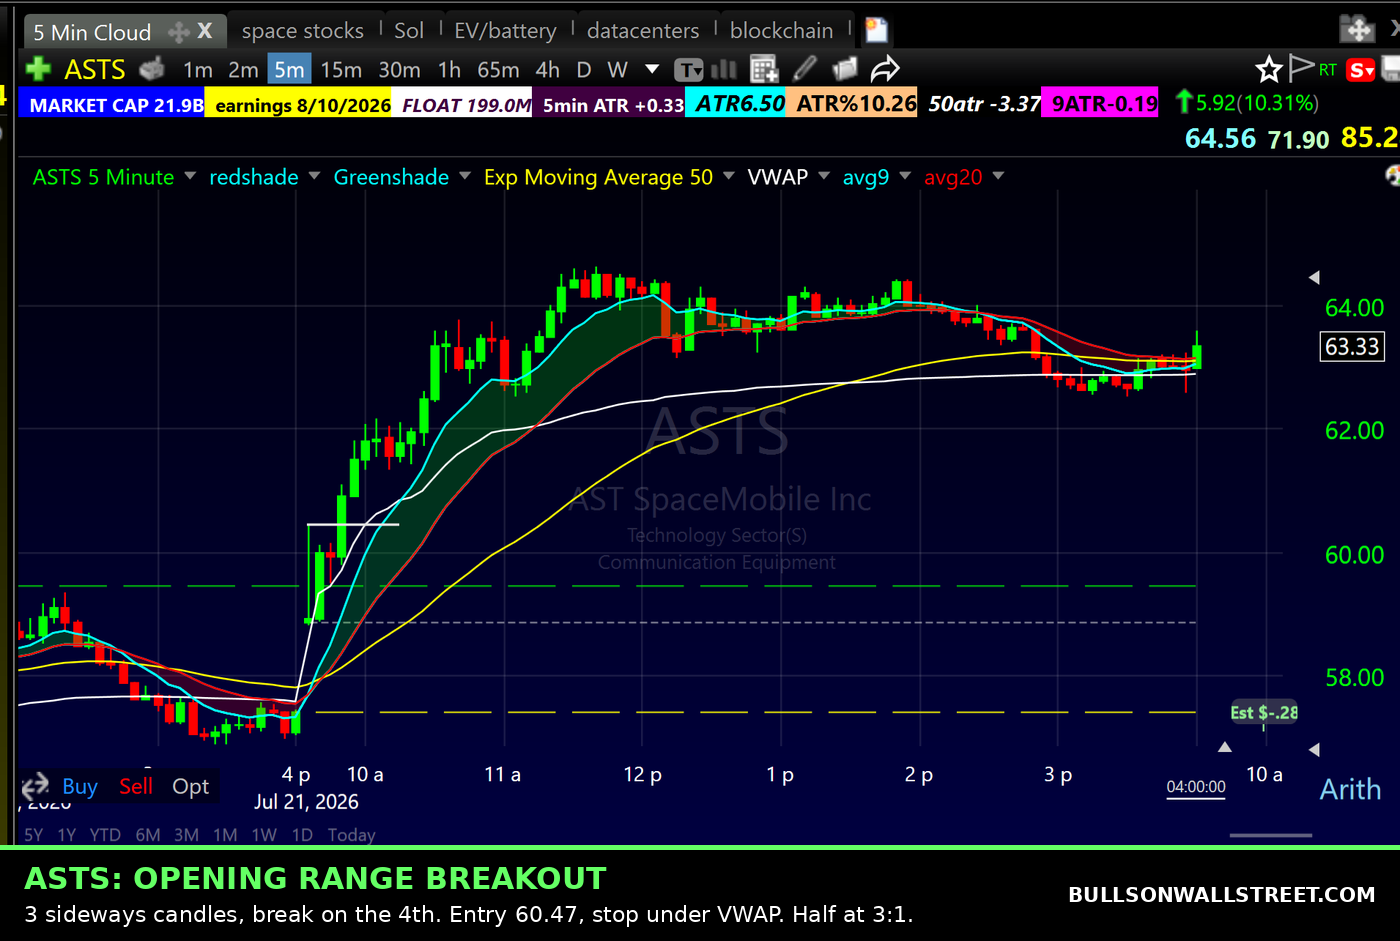
Notice what made both trades work. Not the pattern alone. Gap plus volume plus a clean level plus the right time of day plus a defined risk against a hard line. Five pieces of evidence, one verdict.
The Mirror Rule: Every Pattern Works in Reverse
Here is something almost no pattern guide will tell you, because almost no one writing pattern guides actually shorts stocks. Every single pattern in my system has a mirror image on the short side. Same structure, same logic, same risk anchors, flipped upside down.
The flat top breakout becomes the flat bottom breakdown: a downtrending stock bounces, builds a floor it keeps testing, and when that floor cracks with the 9 EMA curling down overhead, it breaks down the same way a flat top breaks out.
The flag breakout becomes the bear flag: a sharp thrust down, a weak drift higher on declining volume, then the flag breaks and the downtrend resumes.
The opening range breakout becomes the opening range breakdown: gap down, sideways open, break of the range low with the stop above VWAP.
The first pullback long becomes the first pullback short: a stock gapping down rips lower off the open, gives its first weak bounce, and that bounce is your entry to join the downside momentum.
The VWAP bounce becomes the VWAP fade: a weak midday name pops into VWAP from below, fails to reclaim it, and you short against the line with the same tight risk.
One rule, and the entire short side of my playbook unlocks. I short every day using these mirrors. The one short pattern with no long twin is my Parabolic Short, a rare setup that only shows up when a stock goes vertical and exhausts, and it deserves its own full breakdown another day. If you are new, master the long side first. Shorting adds borrow fees, squeeze risk, and unlimited theoretical loss to every mistake, and the market spends more time going up than down. Learn to read the patterns long, then flip the chart.
And the intraday mirror, from July 7: IREN. The stock was already trending down on the daily chart, then gapped down at the open. Three sideways candles while the opening range formed, and on the fourth candle it broke the low of the range. That is the opening range breakdown, the exact reverse of the ASTS trade I showed you earlier. I shorted at 41.75 with my stop at 42.25, just over VWAP. IREN flushed and paid within minutes. One management difference from the long side worth knowing: opening range breakdowns are quick trades built for the open only, so within that first hour you are generally covered and gone.

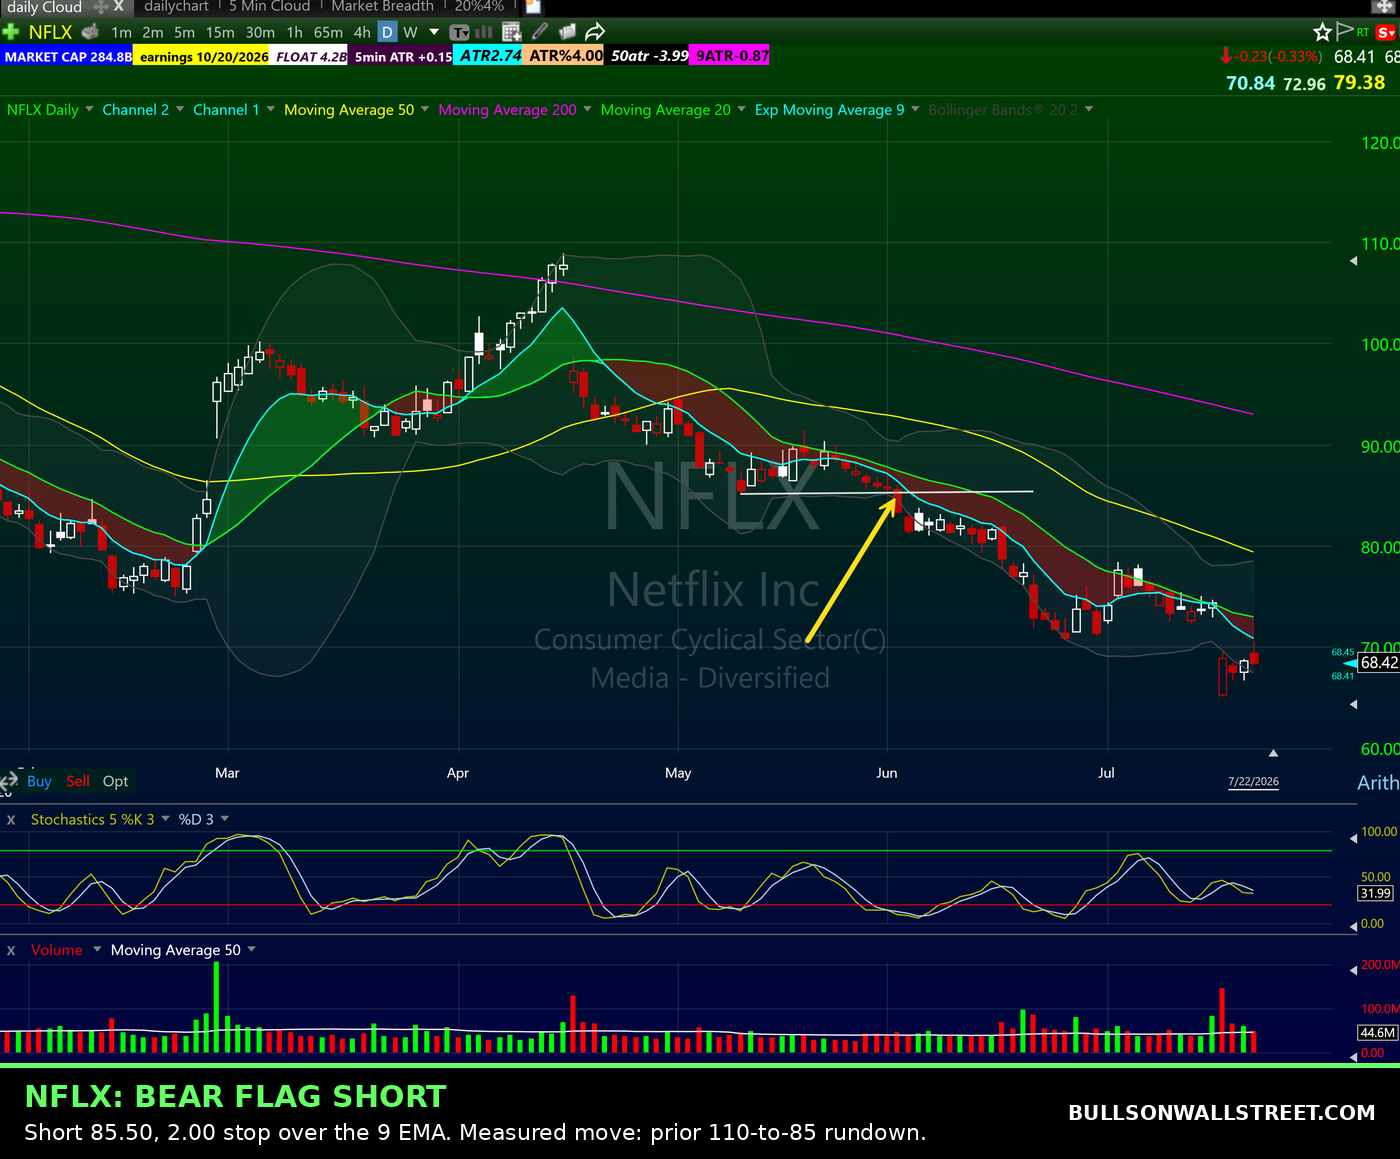
Real example of the mirror in action on the swing side: NFLX. Netflix trended down for two months, then went sideways for a couple of weeks in a really tight range with the EMAs pressing down right on top of it. Textbook bear flag, the exact mirror of the MU flag I bought earlier in this post. When the flag broke down in May I shorted at 85.50 with a 2 dollar stop just above the 9 EMA. And here is a bonus concept that works on every flag, long or short: the measured move. The prior rundown from 110 to the bottom of the flag around 85 tells you what the breakdown can potentially deliver. NFLX bled into the low 70s and under, and the measured move framed the whole ride. Same structure, same 9 EMA risk anchor, same tight-flag requirement as the long side. Just upside down.
The Lawyer Framework: How I Actually Evaluate a Pattern
I coined a phrase for this years ago at Bulls on Wall Street: trade like a lawyer building a case. A lawyer does not walk into court with one piece of evidence. You gather everything before you prosecute.
Before I take any pattern, the case file needs:
The bigger picture trend on the daily and weekly chart. A bullish intraday pattern inside a daily downtrend is fighting the current.
The catalyst. News, earnings, sector momentum. Something has to be driving the move, especially on base breakouts.
Level location. Is the pattern forming at a meaningful support or resistance area, or in the middle of nowhere? Patterns at inflection points work. Patterns in no man's land are noise. If levels are new to you, the SEC's investor education site has a clean primer on support and resistance.
Volume. Breakouts need expanding volume. Pullbacks need contracting volume. Volume is the polygraph of the chart.
The market cycle. This is the piece almost everyone skips and it is the most important one. Match the pattern to the environment. Momentum patterns in a trending market. Mean reversion patterns in a range bound market. Get this backwards and even perfect patterns lose.
Liquidity, spreads, and the stock's history of momentum round out the file. Only when the evidence stacks up does the pattern become a trade.
Watch Out for Hindsight
Every pattern looks obvious after it works. Social media is a highlight reel of cherry picked charts where the flag broke out perfectly and ran 40 percent. Nobody posts the nine flags that failed that same week.
Trading is a game of probabilities, never certainties. One beautiful chart of a head and shoulders does not mean every head and shoulders is a short. Backtest it. Journal your trades. You may find a head and shoulders is only a high probability short after a stock is up more than 100 percent in a week and up three days straight. Now you have a strategy with conditions, sample size, and data behind it instead of a shape and a prayer. The regulated world calls the broad discipline technical analysis, and even the regulator's own definition frames it as studying supply and demand, which is exactly the point: the pattern is a picture of supply and demand, and supply and demand only make sense in context.
And before you can read any of these multi-candle patterns, you need to read the individual candles themselves. Grab my free candlestick chart patterns PDF if you have not already, because candlesticks are the alphabet these patterns are written in.
Takeaways
Patterns are evidence, never verdicts. The edge comes from stacking pattern structure with volume, trend, level location, catalyst, and market cycle.
Split your patterns into two buckets. Daily and weekly chart patterns for swing trading: flat top breakouts, flag breakouts, base breakouts, and daily Bone Zone pullbacks, all anchored to the 9 EMA. Intraday patterns for day trading, matched to the time of day.
Respect the clock. Open patterns from 9:30 to 11: red to green, ORB, first pullback. Midday: VWAP holds, Bone Zone, 50 EMA pullbacks, intraday flags. Close: day-long consolidation breaks.
Match your patterns to the market cycle. Momentum patterns in trending tape, mean reversion in range bound tape. Even the best patterns fail in the wrong environment. Mine included.
Manage every winner the same way: partial at your reward to risk target, trail the Bone Zone, convert to a Free Trade.
Every pattern mirrors to the short side. Flat bottom breakdowns, bear flags, opening range breakdowns, first pullback shorts, VWAP fades. Learn the long side first, then flip the chart.
FAQ: Stock Chart Patterns
Do stock chart patterns actually work?
Yes, but only as one piece of evidence, never as a standalone signal. Academic research from MIT published in the Journal of Finance found some patterns carry real information, but that statistical significance does not automatically translate into trading profits. In my 25+ years of trading, patterns work when they align with volume, trend, level location, catalyst, and the overall market cycle.
What is the most profitable chart pattern?
There is no single most profitable pattern, because profitability depends on context. In my own trading, the first pullback into the Bone Zone during the market open and the flag breakout after a 10 percent or greater thrust are the patterns I have made the most money with, but both fail when run in the wrong market environment.
What is the Bone Zone in trading?
The Bone Zone is my name for the shaded area between the 9 EMA and 20 EMA on a chart. I created the term at Bulls on Wall Street. A pullback into the Bone Zone on decreasing volume followed by a green candle is a high probability entry to join an existing trend. It works on the 5-minute chart for day trading and the daily chart for swing trading.
What chart patterns are best for day trading?
It depends on the time of day. From 9:30 to 11 AM, red to green moves, opening range breakouts, and first pullbacks work best because the market is in price discovery. During midday, deeper pullbacks into VWAP, the Bone Zone, or the 50 EMA fit the slower tape. Into the close, day-long consolidation breaks work as the market picks a direction.
What chart patterns are best for swing trading?
I trade four: the flat top breakout, the flag breakout after a minimum 10 percent thrust with a tight 3 to 10 day consolidation, the base breakout from a stock down 50 percent or more that has built a multi-month base, and pullbacks into the daily Bone Zone on trending stocks. The first two and the Bone Zone pullback live on the daily chart, while the base breakout lives on the weekly because the longer pattern calls for a looser stop and a bigger reward. All four use the 9 EMA for stop placement on their respective timeframes.
Is a head and shoulders pattern reliable?
Not by itself. In a strong bull market a head and shoulders usually just tests support and bounces. It becomes reliable only when combined with a distribution phase market, meaningful levels, and confirming volume. The textbook rule of shorting every neckline break loses money in the wrong environment.
Why do chart patterns fail so often?
Because most traders trade the shape without the context. The most common failures I see: running momentum patterns in range bound markets, trading morning patterns during midday tape, taking patterns that form in the middle of nowhere instead of at meaningful levels, and ignoring volume. The pattern is a picture of supply and demand, and supply and demand only make sense in context.
How do I know if a breakout is real or a fake out?
Build the case before the trade. A real breakout typically has expanding volume, a catalyst driving it, a tight consolidation before the break, alignment with the bigger picture trend, and the 9 EMA curling up underneath to give you a defined stop. Missing several of those pieces raises the odds you are buying a fake out.
What timeframe is best for chart patterns?
Higher timeframes carry more weight. A pattern on the daily chart means far more than the same pattern on a 1-minute chart. For swing trading I use daily charts, and weekly charts for base breakouts since the longer pattern deserves the looser stop. For day trading I use the 5-minute chart as my base, always cross-referenced against the daily to make sure I am trading with the bigger trend, not against it.
Can chart patterns be used for short selling?
Yes. Every pattern in my system has a mirror image on the short side: the flat top breakout becomes the flat bottom breakdown, the flag breakout becomes the bear flag, the opening range breakout becomes the opening range breakdown, the first pullback long becomes the first pullback short, and the VWAP bounce becomes the VWAP fade. The structure and risk logic are identical, flipped upside down. Beginners should master the long side first, because shorting adds borrow costs, squeeze risk, and unlimited theoretical loss.
Do professional traders use chart patterns?
Yes, but differently than retail traders are taught. Professionals treat patterns as context within a complete strategy that defines the catalyst, the level, the risk per trade, the position size, and the management plan. Retail education sells the pattern as the strategy. It is one input out of many.
What tools do I need to trade chart patterns?
You need a real charting platform with customizable moving averages and scanning. I have used TC2000 for years for all my charting and scanning, and every chart in this post comes from it. Beyond software, you need a trade journal, because your own data on which patterns work for you beats any textbook.
Can chart patterns be backtested?
Yes, and they should be. Instead of accepting that a pattern works, define the conditions and test them. You may find a pattern only has an edge under specific circumstances, like a head and shoulders after a 100 percent weekly run. Conditions turn a pattern into a strategy.
Learn to Trade These Patterns Live
Reading about patterns is step one. Watching them get traded in real time with real money is where it actually clicks. In my 60-Day Trading Bootcamp I teach this entire framework live: the patterns, the time of day buckets, the Lawyer Framework, and the risk management that holds it all together. I trade live every single market day and have since 2007.
Apply for the 60-Day Trading Bootcamp here.
If you want to watch first, my YouTube channel has free pattern breakdowns and lessons every week.
About the Author
Kunal Desai is the CEO and founder of Bulls on Wall Street. A professional trader since 2007, he has navigated every major market cycle -- from the 2008 financial crisis to today's high-volatility environments. Having mentored 7,000+ students through his live trading bootcamps, Kunal trades live every morning in the Bulls on Wall Street Trading Chatroom, where a full-access 7-day trial costs $7. He is dedicated to teaching real-world execution and high-probability strategies. Based in Miramar Beach, Florida.
Connect with Kunal: Read his full story | Instagram | YouTube

