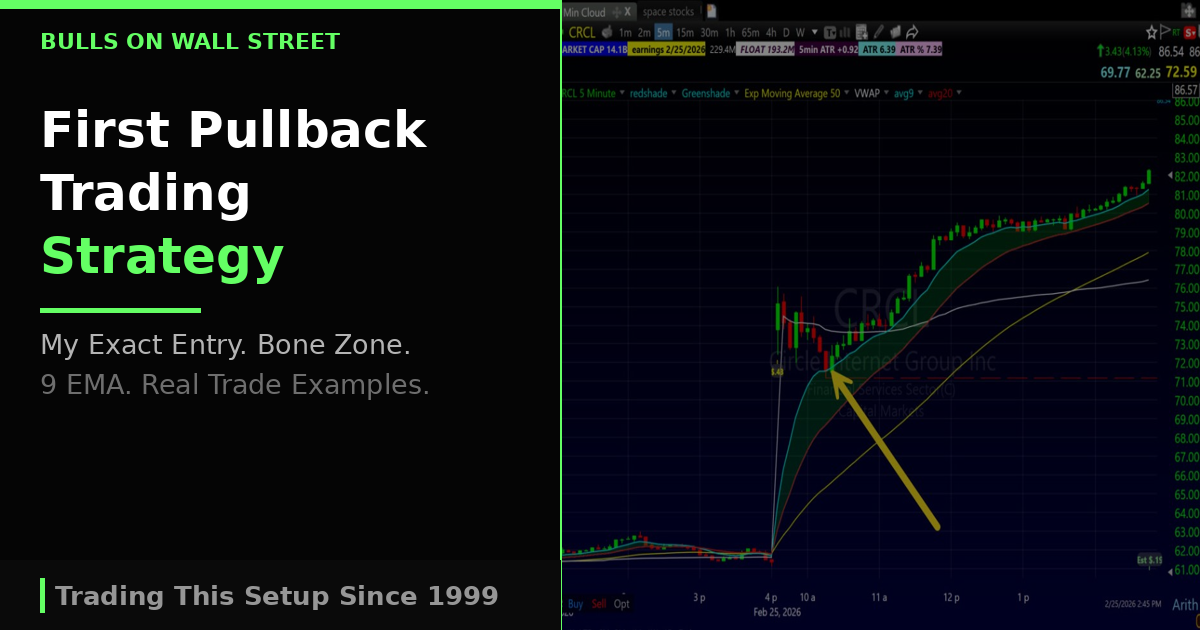


First Pullback Trading Strategy: How to Catch Big Moves Early
I learned the first pullback setup the hard way.
It was 2008. The market was in free fall during the Great Recession. I was chasing breakdowns nonstop — shorting every stock that looked like it was cracking. And I kept getting smoked. The volatility was insane. One candle could rip 10% against you in seconds. I was bleeding money trying to be a hero on every move.
My mentor Paul Singh, who runs our swing trading service at Bulls on Wall Street, finally pulled me aside and told me to stop chasing. Just trade the first pullback to the EMAs, he said. It will get you away from chasing and give you a real low-risk opportunity with more upside.
That changed everything for me.
I have been trading the first pullback almost every day since. Over 25 years of screen time and over 7,000 students taught through our 60-Day Bootcamp, and this is still the first setup I teach on day one. It is the foundation that everything else builds on.
In this guide I am going to break down exactly how I trade the first pullback, what I look for, what makes me skip a setup, and how you can start using this strategy today. I will walk through a real trade I took yesterday so you can see how it works in practice.
What Is the First Pullback Setup?
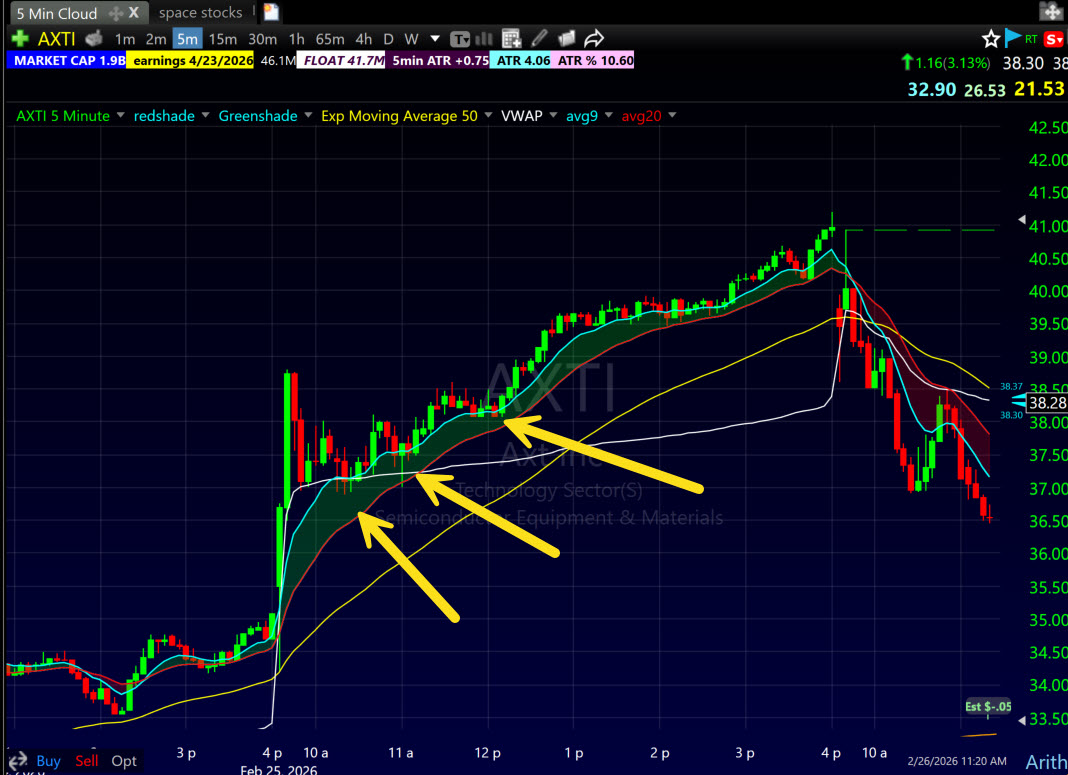
The first pullback is a day trading strategy where you buy a momentum stock after its first pullback into what I call the Bone Zone — the area between the 9 EMA and 20 EMA on a 5-minute chart.
Here is what happens. A stock makes a strong move driven by momentum, earnings, news, or a daily chart setup. It pushes higher on heavy volume. Then it pauses. It pulls back on lighter volume toward the 9 EMA. When it holds that zone between the 9 and 20 EMA and starts bouncing with a green candle, that is your entry.
The logic behind it is straightforward. The initial move proves the stock has buyers and momentum. The pullback shakes out weak hands and chasers. The bounce off the Bone Zone confirms that buyers are still in control. You are buying the dip in a confirmed trend at a level where your risk is tiny compared to your potential reward.
The Bone Zone: My Evolution of the Classic Pullback
Early in my career I used a static 9 EMA as my pullback level. Buy the tap of the 9 EMA and that was it. The problem is that price does not always respect a single line perfectly. You get wicks under the 9 EMA that stop you out, or the stock pulls back close to the 9 EMA but never actually touches it and you miss the entry entirely.
After years of refining this setup, I developed what I call the Bone Zone. Instead of watching a single line, I shade the area between the 9 EMA and 20 EMA on the 5-minute chart. That zone gives me more room and more context. If the stock pulls back into that shaded area and holds, I have my signal. I am not getting faked out by a wick below the 9 EMA and I am not missing trades that pull back close but do not touch it.
The Bone Zone is the single biggest refinement I have made to this setup over 25 years of trading. It turns a good strategy into a great one by giving you a realistic zone of support instead of an unrealistic single line.
Here is a breakdown of how I use this moving average strategy every day in my trading
Why the First Pullback Is the Best Setup for New Traders
I have taught over 7,000 students and I always start with this setup for three reasons.
First, the risk is defined. Your stop loss goes just below the Bone Zone — below the 20 EMA or the low of the pullback candle. You know exactly how much you can lose before you enter the trade. For a new trader, that clarity is everything. If you want to go deeper on managing risk, read my full guide on risk management for day traders.
Second, the reward potential is high. A good first pullback can give you a 3:1, 5:1, or even 10:1 risk-to-reward ratio. If you are risking 20 cents on a stock, you can target 60 cents to a dollar on the upside. That kind of asymmetry is how you grow a small account over time. I wrote a separate post on how to grow a small trading account if that is where you are starting.
Third, it teaches patience. You have to wait for the stock to come to you. You cannot chase. You cannot force it. The stock either pulls back into the Bone Zone or it does not. If it does not, you move on. That discipline is the single most important skill a new trader can develop — and it is the one skill I struggled with most before I learned this setup in 2008.
How to Identify a First Pullback Setup Step by Step
Let me walk you through exactly what I look for.
Step 1: Find Stocks With Momentum and a Daily Chart You Like
Here is where most people oversimplify this setup. They think the first pullback is just about gap-ups. Find a stock gapping up, wait for the pullback, buy. That is the rookie version.
The reality is that this strategy can be applied to any stock that has a trend, momentum, and a high ATR (Average True Range). Often those stocks are gapping, but that is not the only way in. If a stock has a daily chart you like — a clean uptrend, a breakout from a base, relative strength against the market — the first pullback on the intraday chart is in play whether it gapped that morning or not.
If your whole strategy is just playing gappers, you will not make it long in this market. There has to be a deeper understanding of market mechanics and patterns. The first pullback is a tool within a larger framework, not a standalone trick.
That said, I use TC2000 to scan for both gap-ups and stocks with strong daily charts. I have been using it for over 20 years and it is the fastest platform for filtering by gap percentage, volume, ATR, and price range. For more on scanning, check out my post on how to scan for explosive stocks to day trade.
Step 2: Watch for a Strong Initial Move
Once the market opens, I watch how the stock trades. I want to see a strong push on heavy volume. The stock should be moving with conviction. If the action is choppy and indecisive right out of the gate, that is not a first pullback candidate.
Step 3: Wait for the Pullback Into the Bone Zone
This is where patience matters most. Do not buy the first dip. Wait for the stock to pull back into the Bone Zone — the area between the 9 EMA and 20 EMA on the 5-minute chart.
The pullback should look like this:
- Volume decreases during the pullback. Sellers are not aggressive. The stock is drifting back on a lack of buying, not because of heavy selling.
- The pullback is orderly and controlled. It grinds down slowly with small overlapping candles. Not big red bars slamming through support.
- The candles are not wicky or volatile. The best pullbacks look boring. They just drift down into the landing spot over 15, 20, sometimes 30 or more minutes.
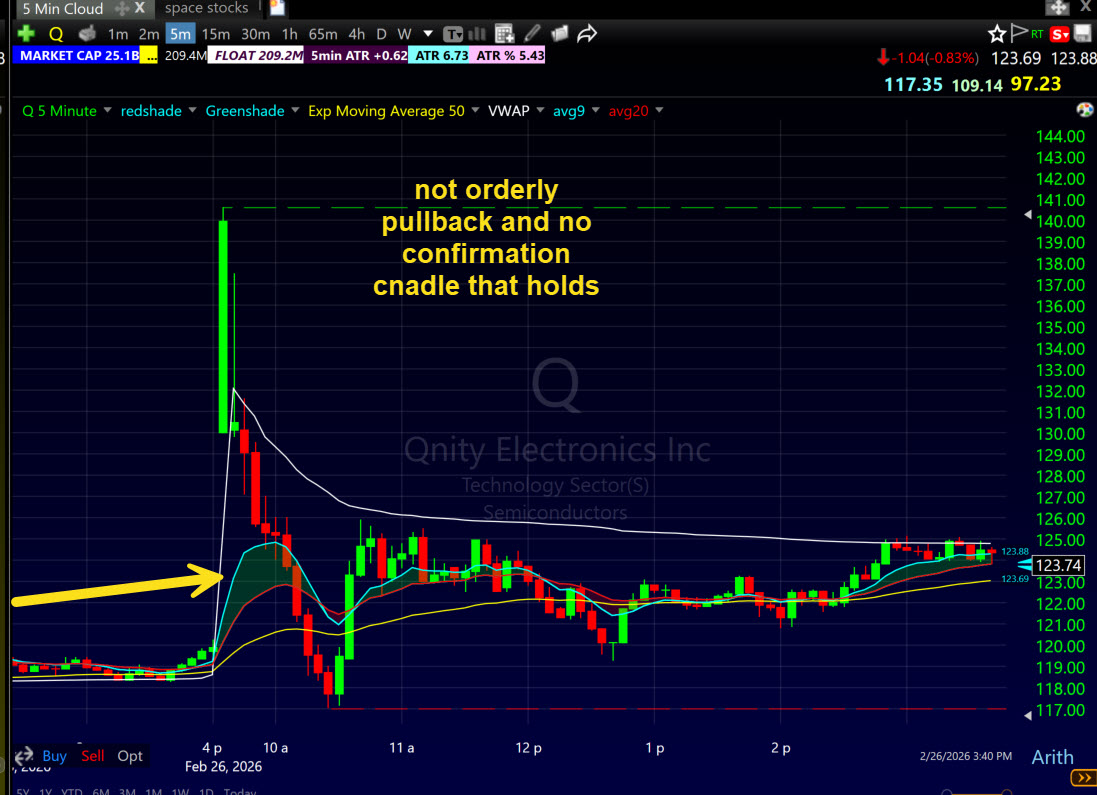
When I take losses on pullback setups, it is almost always because the pullback was not orderly. The stock ramps down too hard and too fast with volatile wicky candles. Those are not true first pullbacks — they are mini-reversals in disguise. The best setups, like the one I took in $CRCL yesterday, just grind down patiently right into the landing spot.
Step 4: Enter on the Green Candle
When the stock enters the Bone Zone and prints a green candle that holds, that is your entry. I want to see the green candle close within or above the zone. That tells me buyers are stepping in at support and the trend is ready to resume.
Step 5: Set Your Stop Loss
Your stop goes just below the Bone Zone — below the 20 EMA or below the low of the pullback. Keep it tight. If the stock breaks through the entire zone, the setup is broken and you want out immediately.
Step 6: Take Profits
I target a minimum 3:1 risk-to-reward ratio. On strong days I trail my stop using the 9 EMA and let the stock trend. I am not a home-run trader. I am a base-hits and process guy — grind it out day after day with consistent entries and disciplined exits. That approach has kept me profitable for over two decades.
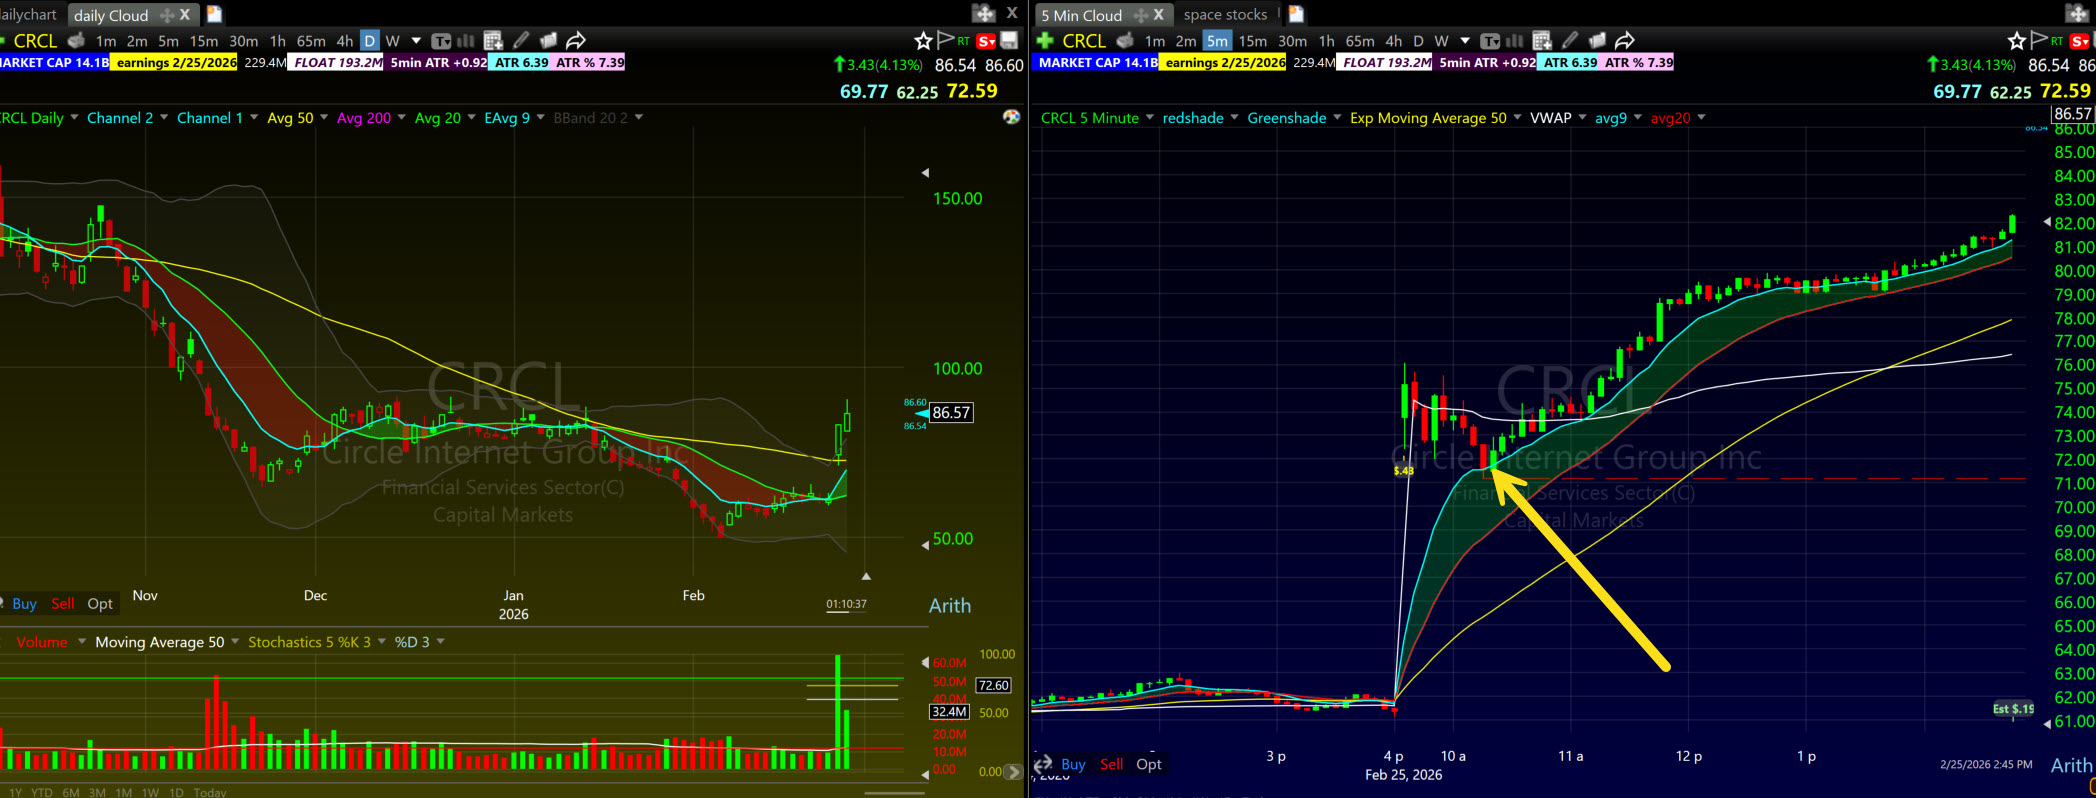
Real Trade Breakdown: $CRCL First Pullback (February 2026)
I took a textbook first pullback trade in $CRCL yesterday and it is a perfect example of how this setup should look.
CRCL had a huge gap up on earnings. The stock pushed hard in the morning on heavy volume. Then it started pulling back — but it did it the right way. It was orderly. It just ground down slowly for over 30 minutes. No panic selling. No volatile wicks. Just a patient, controlled drift into the Bone Zone.
I waited. I did not jump in early when it first started dipping. I waited for the stock to actually tap into that 9 EMA zone. It took over 30 minutes but I was patient. When it hit the zone and printed a green candle that held, I was in.
After the entry, CRCL put in a beautiful trend. It just walked up smoothly off that Bone Zone bounce, and I trailed my stop along the way.
That is what a perfect first pullback looks like — the grind into the zone, the patient wait, the clean entry on the green candle, and the trend that follows.
The Biggest Mistake Bootcamp Students Make on This Setup
After teaching over 7,000 students, I see the same mistake over and over again.
They do not wait for the actual test of the Bone Zone. They see the stock start dipping, they get FOMO, and they buy when there is still too much room between price and the EMAs. The stock has barely pulled back but they are already in because they are afraid of missing the move.
What happens next is predictable. The stock keeps pulling back because it has not reached the support zone yet. Now they are in a drawdown. The loss gets bigger. They panic and sell right at the bottom — right where they probably needed to buy.
The fix is simple but not easy: wait for the actual test. Wait for price to enter the Bone Zone. Wait for the green candle. The setup does not start until the stock reaches the zone. Everything before that is just noise.
Patience is the edge on this setup. It is not a secret indicator or a magic scanner. It is the willingness to sit on your hands and wait for the stock to come to you.
My 8 Rules for Trading the First Pullback
After 25 years of trading this setup, I run through my pre-trade checklist before every entry.
Rule 1: Only trade the first pullback, not the second or third. The first pullback has the highest probability of continuation. By the second or third pullback, the easy money is gone and the reversal risk increases.
Rule 2: Volume must decrease on the pullback. If volume stays high during the pullback, sellers are active and the stock may not bounce. Decreasing volume tells you it is just a pause, not a reversal.
Rule 3: The pullback must be orderly. If the pullback is volatile with big wicky candles slamming through support, stay away. The best pullbacks grind down slowly and patiently into the Bone Zone. Think CRCL — boring, controlled, predictable.
Rule 4: Avoid the first 5 minutes. I do not take first pullback entries in the first 5 minutes of the open. That is pure chaos. I wait for at least 15 to 30 minutes of price action to develop.
Rule 5: Look at the daily chart first. Before I trade any first pullback, I check the daily chart for the bigger picture. Is the stock in an uptrend? Is there nearby resistance that could cap the move? I always check the daily chart patterns before committing to an intraday entry.
Rule 6: Mid-cap stocks are the sweet spot. I focus on stocks in the $10 to $200 range with at least 1 million shares of daily volume. Penny stocks are too erratic. Mega-caps are too slow. Mid-caps give you the best combination of volatility, liquidity, and follow-through.
Rule 7: The setup works beyond gap-ups. Any stock with a clean daily trend, momentum, and high ATR can produce a first pullback on the intraday chart. Do not limit yourself to just morning gappers.
Rule 8: Respect the stop. If the stock breaks through the entire Bone Zone, get out. No hoping. No averaging down. The setup is invalidated and you move on. Respecting your stop is the difference between a bad trade and a blown-up account.
First Pullback vs VWAP Pullback vs Opening Range Breakout
One question I get constantly in the bootcamp is how the first pullback compares to other setups.
The first pullback and the VWAP pullback are cousins. Both are buying momentum stocks on a pullback to a key level. The difference is timing. The first pullback to the Bone Zone typically happens in the first 30 to 60 minutes of the day. VWAP pullbacks tend to develop later, often between 11am and 1pm, which is when I find the best VWAP setups. On many trades, the 9 EMA and VWAP are in the same zone, giving you a confluence entry with even higher probability.
The Opening Range Breakout is a different animal. You are buying the break above a range rather than buying a dip. ORBs can be powerful but they carry more risk because you are buying at the top of a range rather than at a support level. I trade both, but for newer traders, the first pullback is safer because your stop is tighter and more defined.
The best traders know when to use each tool. But if you are just starting out, master the first pullback before adding anything else.
Common Mistakes Traders Make With the First Pullback
Beyond the FOMO mistake I covered above, here are the other errors I see constantly.
Chasing the initial move instead of waiting for the pullback is the number one killer. When you see a stock ripping 10% in the morning, the urge to jump in is overwhelming. But that is exactly when your risk is highest and your reward is lowest.
Taking the second or third pullback thinking it is the same setup. It is not. The first pullback works because the stock is proving momentum for the first time intraday. By the second and third pullback, the momentum is often exhausted.
Using a static 9 EMA line instead of the Bone Zone. If you are watching a single line, you will get stopped out on wicks that briefly violate the 9 EMA but hold the 20 EMA. The zone gives you realistic support context.
Ignoring how the pullback looks. Volume and candle character matter more than the level itself. An orderly 30-minute grind into the zone is a buy. A volatile 5-minute slam through the zone is not.
Trading without understanding the daily chart. A perfect first pullback on the 5-minute chart means nothing if the stock is running straight into daily resistance. Always check the bigger picture.
if you want to understand how to read the broader market environment before taking these setups, read my market pullback setup guide
The Tools I Use to Trade the First Pullback
I keep my setup simple. I use TC2000 for charting and scanning. It is the fastest scanning software I have tested and the charts are clean and customizable. I have a 5-minute chart with the 9 EMA and 20 EMA with the Bone Zone shaded between them. That is it. No RSI, no MACD, no Bollinger Bands cluttering the screen.
For execution I use E*TRADE and Thinkorswim. TC2000 handles all the analysis and scanning. The broker handles the execution.
You can read my full TC2000 Review where I compare it to TradingView and Thinkorswim and explain why I have stuck with it for over 20 years.
Watch Me Trade the First Pullback Live
I trade the first pullback live on my YouTube channel and break down the setup in detail so you can see exactly what I see on my screen. Subscribe to my channel at youtube.com/@kunaldesaitrading where I post live trades, market analysis, and educational content every week.
Ready to Master This Setup?
The first pullback is one of the highest-probability setups in day trading, but reading about it is not the same as trading it live. In our 60-Day Bootcamp you will watch me trade this setup every day in real time. You will see how I scan for stocks, identify the Bone Zone, manage the entry, and trail the stop.
Over 7,000 students have gone through this program since 2008 and the first pullback is the setup they all start with. It is the same setup my mentor taught me during the chaos of the 2008 financial crisis, and it is the same setup I still trade today.
If you want to learn how to trade with a proven strategy and live mentorship, apply for the bootcamp here.
FAQ
What is the first pullback trading strategy? The first pullback is a day trading setup where you buy a momentum stock after its first pullback into the Bone Zone — the area between the 9 EMA and 20 EMA on a 5-minute chart. The stock makes a strong move, dips back into the zone on lower volume, and when a green candle holds the zone, you enter the trade with your stop just below.
What is the Bone Zone? The Bone Zone is the shaded area between the 9 EMA and 20 EMA on a 5-minute chart. Instead of using a single static line as your pullback level, the Bone Zone gives you a realistic support zone. This prevents getting stopped out on wicks that briefly violate the 9 EMA and helps you avoid missing trades that pull back close to the 9 EMA but never quite touch it.
What is the 9 EMA and why do you use it? The 9 EMA is a 9-period Exponential Moving Average. Unlike a Simple Moving Average, the EMA gives more weight to recent price action, making it more responsive. On a 5-minute chart, the 9 EMA tracks the short-term trend tightly enough to give you clean pullback entries without too much lag.
What timeframe do you use for the first pullback? I use a 5-minute chart for entries and the daily chart for context. The 5-minute chart gives you the resolution to see the pullback and the bounce clearly. I also check the daily chart for trend direction and nearby resistance before taking any trade.
When during the day does the first pullback happen? Most first pullback setups develop between 9:45 AM and 11:00 AM EST. The stock needs time to make its opening move first, which usually takes 15 to 30 minutes. Some pullbacks take longer — the CRCL trade I took recently took over 30 minutes to grind into the zone. Patience is key.
Does the first pullback only work on gap-up stocks? No. This is a common misconception. The first pullback works on any stock with a trend, momentum, and a high ATR. Stocks that gap up on catalysts are one source, but any stock with a clean daily chart in an uptrend can produce a first pullback on the intraday timeframe. If your whole strategy is just playing gappers, you will not last long.
What kind of stocks work best for the first pullback? Mid-cap stocks in the $10 to $200 range with at least 1 million shares of average daily volume. They need momentum — whether from earnings, news, sector strength, or a clean daily trend. Avoid penny stocks and mega-cap names.
What is a good risk-to-reward ratio for this setup? I target a minimum of 3:1 risk-to-reward. If I am risking 20 cents per share, I want at least 60 cents of upside. I am not a home-run trader — I focus on base hits day after day with consistent process. That approach has kept me profitable for over 25 years.
How do I know if the pullback is orderly or a reversal? Volume and candle character tell you everything. An orderly pullback has decreasing volume, small overlapping candles, and a slow grind into the Bone Zone. A reversal has heavy volume, big red candles, and volatile wicks smashing through support. When the pullback is messy and wicky, stay away.
What is the biggest mistake new traders make on this setup? Not waiting for the actual test of the Bone Zone. They see the stock dip, get FOMO, and buy when there is still too much room between price and the EMAs. The stock keeps pulling back, they take a big drawdown, and they sell at the bottom — right where they should be buying. Wait for the zone. Wait for the green candle. The setup does not start until price reaches the zone.
Should I buy at the 9 EMA or wait for the bounce? Wait for the bounce. I do not buy just because the stock touches the 9 EMA. I want to see a green candle form within the Bone Zone first. Buying the touch without confirmation means you could be catching a falling knife.
Can I use the 20 EMA instead of the 9 EMA? The 20 EMA is the bottom of the Bone Zone, not a separate entry point. If a stock pulls all the way through the 9 EMA to the 20 EMA, I still take the trade as long as it holds the 20 and the pullback was orderly. If it breaks through the 20 EMA, the Bone Zone is broken and the setup is dead.
Does this work for short selling too? Yes. The inverse setup works on the short side. Look for stocks with downward momentum that bounce up into the Bone Zone on decreasing volume. When the bounce fails and the stock starts dropping again, that is your short entry. Same rules, flipped.
How do I learn to trade the first pullback live? I teach this setup every day in the 60-Day Bootcamp at Bulls on Wall Street. You watch me scan, identify the Bone Zone, and trade first pullbacks in real time with live screen share. Over 7,000 students have learned this setup through the program since 2008. It is the same setup that transformed my trading during the 2008 financial crisis and it can transform yours too.
This strategy is part of our complete day trading strategies guide covering the setups professional traders use every single day.
About Kunal Desai
Kunal Desai is the CEO and founder of Bulls on Wall Street. A professional trader since 2008, he has navigated every major market cycle—from the 2008 financial crisis to today's high-volatility environments. Having mentored thousands of students through over 79 intensive trading bootcamps, Kunal is dedicated to teaching real-world execution and high-probability strategies. Based in Miramar Beach, Florida, he balances the intensity of the trading desk with a focus on fitness, family, and performance cars.
Connect with Kunal: Read his full story here | Instagram | YouTube